Configure Network TCP/IP Settings - Vista Touch Series
Before You Begin
- Grab your network details or ask IT for: IP Address, Subnet Mask, Gateway, DNS (for Static IP setups).
- If your site uses DHCP, confirm a lease is allowed for this device.
- Write down any current values on the meter so you can revert if needed.
Navigate to Network
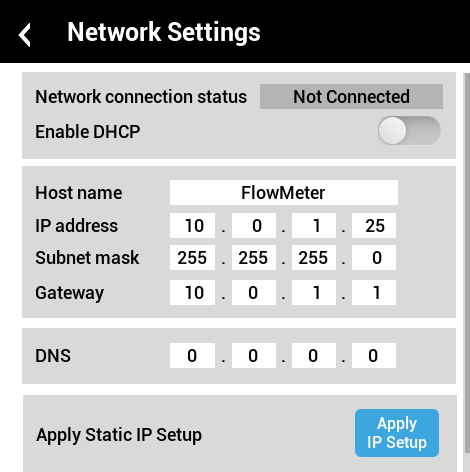
On the meter UI, open Network to choose your network settings:
|
DHCP-enabled network (Managed network with DHCP)
|
|
|
Static IP network (Managed network with Static IP)
|
|
|
Isolated / ad-hoc Ethernet (Direct PC-to-meter)
|
|


Cloud Connection (Optional)
If you’re not using Trumeter Cloud, set Cloud Connection to OFF to keep traffic local. You can enable it later without redoing IP settings.
Post-Configuration Checklist
- The IP is unique (no duplicates on the network).
- Subnet and Gateway match your network.
- DNS set per site policy (or 0.0.0.0 for ad-hoc).
- You can ping the meter from a PC on the same network.
- Your SCADA/PLC/application sees the device at the expected IP.
- Any required firewall rules/ports have been allowed by IT.
- Maximum telegram duration 5000mSec
- Pause Between Telegrams 250mSec (but could be shorter if speed is essential)